Wednesday, 30 September 2015

Life Drawing - Session 2

For our second session of life drawing, we had a man this time and the same as last time we did a few quick 5 minutes drawings of him in different positions and poses.


We then moved onto the 10 minutes drawings but this time we had to use our non dominate hand or our off hand.


We then moved onto something else, for the first 10 minutes every one had to draw him to make him fit the whole A3 sheet. Then the next 10 minutes we had to move to the easel on our right which had that persons drawing of him and had to drawn on that personal sheet our of perspective of how we saw the man ;erasing, drawing over to make it better. Then we moved on again to the person to the right to do the same thing for another 10 minutes, in total of about 30 minutes. This is how my one ended up after the 30 minutes.


Then for the last 10 minutes we did another drawing, we got to use either to draw with or domain hand or to use our opposite hand to improve or experiment a bit more. I stuck with my dominant hand.


Tuesday, 29 September 2015

CGA Visual Design Lesson 2 - Bug!

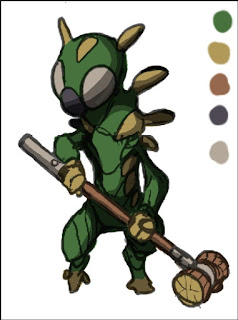
During our second lesson , we the task to draw and paint in a bug following a step by step image instruction document. 


First off we were also given a starting layout document and the basic colours that was used in the instruction document.


I then proceeded to then drawing a black outline and colour it in using the basic colours on a separate layer on Photoshop 


I add some shade onto the painting on a separate layer where the shadows should be using 50% and 75% Gray.


After this I then started to properly paint to make him all nice and sparkly by blending in much harder tonnes with lighter tonnes as well as refining the edges of the bug. 


 Lastly I added some ground and shadow.


Monday, 28 September 2015

CGA Visual Design - One Point Perspective

As additional work, our teacher posted 2 videos on how to do one point perspective drawing, to help people learn about it for future use. I already knew a little bit of one point perspective so it wasn't too bad for me.

For the first video we followed ( https://www.youtube.com/watch?v=yEymIyLbiAI ), we had to draw a room following the instructions and I came out with this.


For the second video we had to draw a urban landscape following the video guide ( https://www.youtube.com/watch?v=SCW9D2GytHo) and came out with this. I have also looked at other videos that this person as done, going through 2 and 3 point perspective which is very useful.


Friday, 25 September 2015

CGA Gameplay and Interactivity Lesson 1 - Creativity

For our first lesson of Gameplay and Interactivity, we where put into groups of five. Each group then had to put out two random words out of a box, what ever two words the groups got; in the end we had to come up with a game idea and present it to the class at the end.

My group got Library and Rainbow, so we came up with a new games ideas such as making it a very basic where you you a gun that shoots the 7 different colours of the rainbow out to colour in the library, but you had to go and run around to get each colour. Our ideas progressed a bit further to making it where the colour of the library has been sucked out so its all black and white, and you had to run round the library looking for the colours to restore the library, making it kind of a puzzle game looking through specific items in the library such as a red book and such.

About half way through the lesson we came up with the idea of making focusing on a much older audience where you as the player was put in a coma and wake up in the coma at the front desk of the library. You have no idea who you are and how you got here but you as the player need to mind out why you are here and how you got into the coma. So we decided the game would be a first person mystery puzzle.
There are seven coloured doors of the rainbow within the library, containing puzzles for the player to solve and at the end of each door, you recover a piece of your memory and which ever colour door you complete, the library also gains that colour back. You can choose which ever colour door to go through first, memories would not be in order so at the end of the game you need to piece everything together. We decided as you progressed through the game and each colour door you complete, the library gets more distorted and creepy , almost turning it into a bit of a scary tense atmosphere. The player can leave at any time choosing where to end the game where they are or to continue to play though the game and find out what happened.

By then when we almost finished our game idea, our teacher gave us his attention for a brief moment. He gave a small talk about some thing called the One Sheet which looked like this.


We then add to go through this sheet before finally presenting it to the class.
We had to give the game a title which in the end my group din't come up with.

The X, which is the description you would read of the game on the back of a game case or on game sites such as G2A or Steam.

The X : " name of game" is a first person puzzle solver. Enter the game to find out who you are by collecting information and what mysterious lies within you.

The 4 Pillars, which are the rules of the game which can not be broken. The game is based around the 4 pillars to make it challenging.

The 4 Pilars: Can not see or hear the player/character.
First person keyboard and mouse ( can use a controller )
Can not do 2 things a once e.g walk/run and jump
Follow the Colours of the rainbow.

The Player Piece, which is the character profile.

The player Piece : Alexander Cage , a female in her mid 20's not much is known about her. Play through the game :)

Other important information and mechanics : Search for clues and solve the puzzles in each coloured door to unlock a flash back.

At the end of the lesson when each group represented their game ideas, all the ideas were very interesting either being a complex game or even a simple one.
In the end some groups including ours came up with a idea for a game that was a bit too complex where we could have just gone with some more simpler like earlier when I mentioned running around the library with a gun to colour it in. I think in the end my group came up with a idea and stuck to it instead of focusing on one specific target and made everything mound around our game. It was a good experience and helped me learn alot.

Thursday, 24 September 2015

CGA 3D Art Production Lesson 1 - Making a Barrel

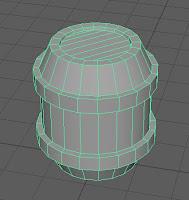
Our first lesson of 3-D art production was to make a barrel as a task to help people that are new to Maya 2015/2016 get a grip on how to use it and the tools that are provided. We were given a step by step guide by our teacher on a document. 

I found it quite difficult  and ended up with a one problem leading to another just due to accidentally missing out a step or didn't quite understand the guide. Although in the end I did manage to get the shape of the barrel correct and managed to finish it up by following the guide. As I said it was difficult but what is the joy of learning something easy or without a few struggles along the way.

This is the basic barrel shape I ended up with which I am quite proud of, with a bit of help from some class mates and our teacher.


We then proceeded to colour it in or give it some texture so we when on Photoshop, we had four layers to make the texture.


The UVSnapShot was to show the the build and the outline of the Barrel.


The Barrel_AO was when we rendered the Barrel.


Barrel_Metal was a copy of Barrel_AO but was just to copy the two white lines and also the layer which I used to add other colours.


And the final Layer was the Base which meant to be the layer used to add other colours and textures to make the barrel look the way you want it but I found using that layer wasn't as effective as it was to use the Barrel_AO layer to add colour.


In the end when we make every layer visible except the UVSnapShot layer because we don't need it when texturing the barrel, looked a bit like this on Photoshop as well on the barrel.


That was it for our barrel lesson but instead of leaving it as it is, I went back onto Photoshop to change it a little and to make it suitable for the Battle Arena we will be making later in the year.I planned to have a barrel in it any way,so making it on the first lesson was a big help.

I tried to make my texture of the barrel a bit kinda of old, like it was covered in leaves or ivy like it been left in one place for many years. The darkness of the barrel (hard brown), using that to make it appear as it it has soaked up a lot of rain over the years giving it that old kind of look.


Wednesday, 23 September 2015

CGA Visual Design Lesson 1 - Colouring a Robot

During our first lesson, we were given a task to draw and colour in the picture of the robot below on Photosho, it was to see how comfortable it was for us to use our graphic tablets to draw and paint.


I first started off  drawing the outline of the robot roughly, trying to get the right  angles and proportions.


 After roughly drawing the outline I then blocked in the shape of the outlines using 75% Gray.


I then started to fill some places with white.


When finishing applying some white tones, I then proceeded to had hide the white layer and started to add a bit of black, 80-90% Gray and a bit of white to distinguish which part had lighter of hard tonnes.


After wards I then put the white layer of paint visible again and proceeded to had some background colour and shade on the ground where he would be standing.


Finally I gave my robot a shadow to make him actually appear some what physical instead of  a robot that doesn't exist or isn't touching the ground. Personally I found it very fun and helped me improve my skills of using a graphics table as well as Photoshop. The most important thing that was made clear to me when doing this work was that it indicated that I wasn't so good at blending the colours or made it so the colours looked very solid to identify which part was which in the painting I have done.

Life Drawing - Session 1

I went into my first life drawing session, inexperienced compared to maybe some other that may have done life drawings already in college or in a foundation year. We first did 3 sort and quick drawings of our model having 5 minutes to start off with as a warm up.

We then spent a bit longer on 3 new drawings to get more detail onto the paper which lasted 10 minutes each
.


We continued onto finishing off the sessions by going back to use a old technique we would have used in school, which was the continuous line drawing.


I did definitely the experience of doing a life drawing for the first time, as I can then use this improve my understanding of the human figure and how it works as well as the amount of detail you need to put on the paper visually form your eyes. It wasn't so hard to get the proportions when holding up the pencil as a guide but was much harder when doing the continuous line drawings as we couldn't take the pencil off the page.

Tuesday, 22 September 2015

CGA Visual Design - Robot Design Concepts and Welcome!

Hello, this is my first post and I'm going to go through and explain my robot concept designs, eventually how it lead to my final piece.

I first started off by looking at different kinds of robots within games and movies such as a few Guild Wars 2 robots such as the Steam Rider and Communication Relay Golem, the Eye Bot from Fall out 3, EVE from WALL.E and the famous Squiddies (Actual name: Sentinals) from The Matrix trilogy. 


Looking at different parts and features of the robots such how they would kill, move and relay information and most importantly they all can fly/float in the air having something in common which I wanted for my first robot concept.

I looked at the Sentinels and Steam rider weapons and how they would use them to kill, the sentinels uses their claw like  tentacles to grab and rib things apart while the SteamRider use their sharp like weapons to slash and cut and shoot out a lazer to disintegrate their enemy's.


I then looked at the Communication Relay Golem and Eye Bot, focusing more on how they relay and receive informations. The Eye Bot most known in the Fallout game series to play music certain radio channels while wondering around the apocalyptic wasteland, receiving  radio waves from their many antenna's. The Relay Golem is another example but relays information through a holographic kind of table but was mostly thinking of it as a support bot.


Which then all the ideas let me to my first robot concept, I was thinking of a kind of tag team robot unit where two robots are joint together by the robotic tentacle circuits and can detach from each other at any time when necessary. 


I made it so the left robot is like the support bot with many claws used for grabbing and repairing, using its welder which produces flames between the claws. It also has a little antenna to relay information to the Kill Bot ( Right robot) It's small and fast which a big and small eye to look far distances for enemies. It doesn't have much to defend it self so being small and fast is it's only advantage in battle.

The right robot that does all the dirty work, going around killing things equppied with muiltiple weapons such as knifes, round saw, guns and lazers (located in front of the little antennas , the little circles) It gets heavy damaged in combat which is why the support bot is their to patch it up. 

One can't survive without the other!!


Moving onto my second concept design, I looked at a few more robots from Guild Wars 2, some from Star Wars and Castle in the sky. Looking more at the golems from Guild Wars 2, I researched
a few more in the form a humanoid kinda of figure looking at the classic Golem and many others.

From Star Wars I looked at the normal battle droids, D2 Superbattle Droids and Droideka's. 


I looked at the weapons the droids use in Star Wars and their mechanics. All droids are equppied with some sort of long ranged weapon, either a lazor rifle .Attached lazors on arms/rockets on the D2 SuperBattle Driod and more lazors on the Droideka. 

The Doideka can turn into a ball for a faster way of transport but when entering into combat, its movements decrease drastically walking on its three claw like legs. It can also deploy a shield when stationary shooting making it vulnerable when moving around.

The Guild Wars 2 Golems also have lazors and rockets at its disposal, as most of the golems hands aren't psychically attached due to a magically advanced race, it can do a volley of extended punches and a spinning attack with its arms out. Most Golems also have a self repair system which shuts the golem down to do repairs but of course it is vulnerable to being attacked during that state. Both golems and the robot from castle in the sky have jet packs under their feet and on their backs but not of them do. Which lead me to creating my second concept by combining most of the features.


For my third concept I looked at my second concept and tried to base it off that but in a more simple way with out all the guns and floating magical arms and such. I looked some robots from the Transformers Series such as Optimus Prime Bumble Bee and some dog like robots from transformers 2 and 4 (https://belovedmeadow93.files.wordpress.com/2014/06/transformers2_sd1011.jpg , https://blogger.googleusercontent.com/img/b/R29vZ2xl/AVvXsEi6HNbiD8S1KU-k-NZQpeyKogdL3astjBdsX5p4k1Dod3KdZghxzjzfrAIL2HGo7BuenxmmUCwkAi9-RQCibrI5vlSkkFEYyk7E9C6nOqn3Mo-CZp7AnfIFEWHiXRGtfPHDgWxfJlt48-Yp/s1600/R_LockDownDogV01_121119_Revisions03_LengthyA_FDM.jpg ). 

 I also looked at Atom from Real Steel, Raiden from the Metal Gear Solid , The Terminator and some Mecha robots from a anime called Break Blade (mainly look at Delphine which is the robot) http://breakblade.wikia.com/wiki/Delphine

I was looking at more of a humanoid robot and body structure. How the body can move, I mainly looked at Raiden, even though he isn't actually a robot, he's a cyborg. Keeping more of a humanoid body making it easier to refer to when doing my third concept. When look at Raiden, Atom form Real Steel and Terminator, both Raiden and Atom don't use any forms of guns but mainly using their fists or a sword (for Raiden) and can move easily as a human or even faster can as both are made for close quarter combat. Terminator can also move as faster than a human but as he seems indestructible in most movies anyway, he just takes it slow like a badass.

Looking at Delphine and Transformers, I wanted to look at more of a kinda of hybrid robot such as in transformers. They are cars or any type of vehicle used in the human world that can then transform in ahumonoid robot within seconds with guns and rockets equipped. Delphine is a bit different as it need a human inside to operate it by moving to handles, pressing the gears down and pulling levers and such in order for it to move and turn. Delphine also uses swordsm shields and guns but overall still focusing on the structure of it which lead to me creating my third piece and is meant to have a sword.


Now onto the Final piece ,putting everything together from all my concepts. I decided to create something a bit more hybrid.

Small backstory : Set in the future where were terrorist attacks is very common. The military created a Robotic AI that would serve and bring peace to the country. An assassin created to kill using varies methods including his sniper rifle, ordered to eliminate important terrorist cooperatives to better the half torn world. Although during one mission, a unexpected event caused the AI memories to be corrupted, therefore losing it's meaning of why it was first created. Lieing in the dumps, some one found it, taking it in and varies things happened after wards leading it to be a bounty hunter helping the weak.